The recipe comes from "Lauren's Latest" which is amazing and super legit foodie blog (I mean the woman was on Good Morning America-come on!). Her tag line says it all: Everyday Ingredients-Extraordinary Food; now that's my kind of woman.
The recipe makes 48, but I had no need for 48 brownies (nor did my waistline) so I halved the recipe instead.
 |
| Her's. They are adorable. Photo from www.laurenslatest.com |
 |
| Surprise inside! Photo from Laurenslatest.com |
 |
| Mine (See Revisions below) |
 |
| Not as pretty, but same result! |
Here it is:
Mini Mint Truffle Brownie Bites
yield 48
Ingredients:
for the brownies-
1 cup butter
6 oz. Scharffen Berger bittersweet dark chocolate
5 tablespoons Scharffen Berger cocoa powder
2 cups granulated sugar
4 whole eggs
1 1/2 teaspoons vanilla
1/2 teaspoon baking powder
1 teaspoon salt
1 3/4 cup all purpose flour
48 Mint Truffle Hershey Kisses, plus more for garnish if desired
 |
| All the soldiers |
Note: I have no idea what Scharffen Berger chocolate and cocoa are. I had Hershey's Cocoa and Ghirardelli Chocolate in my pantry so that's what I used. It's good enough for me.
for the frosting-
1/2 cup butter, softened
2 cups powdered sugar
1 teaspoon peppermint extract
1 teaspoon vanilla
splash of milk, if needed
green food coloring
1/2 cup butter, softened
2 cups powdered sugar
1 teaspoon peppermint extract
1 teaspoon vanilla
splash of milk, if needed
green food coloring
Directions:
Preheat oven to 350 degrees. Line 48 mini muffin tins with paper liners and set side.
Preheat oven to 350 degrees. Line 48 mini muffin tins with paper liners and set side.
Melt butter and chocolate together in microwave. Stir in sugar and cocoa. Stir in eggs and vanilla. Stir in all dry ingredients. Spoon into prepared pan to fill 2/3 way. Unwrap Mint Truffle kisses and press 1 into each brownie bite. Bake 10-12 minutes or until brownie is thoroughly cooked. Cool completely.
 |
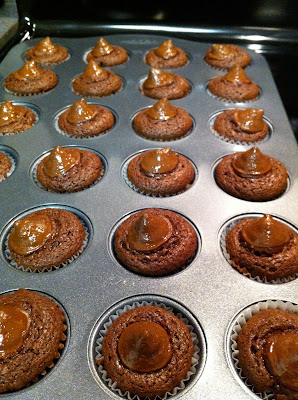
| Pre oven |
 |
| Fresh out of the oven |
For the frosting, whip all ingredients together in a large stand mixer until smooth and creamy. Frost the tops of each brownie bite and add a piece of mint truffle kiss to each one as decoration. Serve.
 |
| My prettiest one. It was downhill from here. |
Pros: They are delightfully good. The softness of the brownie with the gooey Kiss inside makes it a dessert that you can't have just one of. These are definitely for the true mint lover.
Cons: I'm not sure why, but my brownies stuck to the mini muffin liners really badly. I've never had that happen before. This next one is really a personal con, but I stink at using a pastry bag. I used one of the disposable ones that you stick a nozzle in one end, fill the bag with frosting, and then squeeze it onto the brownie. This is the first time I've used one and let me tell you it is a messy business! Also, I completely missed the part where you are instructed to fold down the top end so that it doesn't end up coming out the nozzle and the top of the bag while you are decorating. Frosting was everywhere. I would have taken a photo if I didn't have icing all over my being. So noted.
In lieu of a pastry bag I think you could just smooth some frosting on with a knife and they would be just as good. Throw on some sprinkles or another Hershey Kiss to cover up any mistakes. It takes awhile to learn how to ice, I'm still learning obviously, and if I can be completely honest, after 18 I said forget it and just iced them with a butter knife. They taste just as good.
Revisions: I noticed that it took more like 13-15 minutes for my brownies to bake. Also, I added a splash of heavy cream in with my frosting because I had some that I had to use up and while not the healthiest option, it is delicious. I also had a little milk thrown in, but next time I would use one or the other because my frosting was a little watery.
Also, as you can tell, mine look a lot different from Lauren's (unless you are color blind). I didn't have green food coloring in the house, so I figured red would do. And I was too lazy to half the Kisses and use them as garnish, so I threw a pearl looking sprinkle I had on top. Sometimes you just have to use what you have and make it work. As long as it tastes good, that is what is important!
Overall these get two thumbs up. They do take some time, but true to her word, they involve most ingredients one already has in the house and they are actually extraordinary.


No comments:
Post a Comment