Saturday, December 31, 2011

Happy New Year: Campfire Cookies

Ah what a year 2011 has been. In this year we had Kim Kardashian getting engaged, married, and divorced (separate TV shows to document each adventure of course-that woman's life is Big Brother), Lindsay Lohan going to jail (it's like groundhog day for her every year), Jennifer Aniston had roughly 15 pregnancies and 4 sets of twins according to the gossip rags, and a lot of other much more important things than that occurred in Twenty Eleven. It also saw a rise in online blogging with the start up of Pinterest, and with that, a  surplus of recipes hit the online world hence the development of this blog. It is only fitting that we end 2011 on some sugary delectable note, which is why I chose to share my review of "Campfire Cookies."


Check out those bad boys


I discovered Campfire Cookies on Pinterest (obviously) and they come from a foodie blog called "Fahrenheit 350". They are  surprisingly easy to make and the name says it all; they are quite literally cookies in S'mores form, like you would enjoy around the campfire. What makes them unique is that the cookie, which has chocolate and marshmallows (yum) baked in, rests on graham crackers. Here's the recipe:
Fahrenheit 350's pre oven. Photo from www.Fahrenheit350.blogspot.com

Campfire Cookies
From: Fahrenheit 350


1 cup butter
1 cup brown sugar
Cream together butter and sugar until incorporated

Add:
2 eggs
2 teaspoons vanilla
Beat thoroughly

Add:
2 cups flour
½ teaspoon salt
1 teaspoon baking soda
1 cup chocolate chips, or one giant Hershey's bar, chopped
1 cup mini marshmallows
Stir to incorporate
The most fun part about these cookies is that you actually bake the cookie on top of a whole graham cracker.


Bake at F350°, for no more than 11 minutes (after 11 minutes, the graham cracker will burn).
Some of the marshmallow may toast off the cracker, but simply remove the cracker from your cookie sheet and quickly transfer to a wire rack.
Yields 4 dozen

Pros: They are heavenly! Seriously, why I didn't think of putting S'mores and cookies together to make a delicious S'morsey cookie baby before I do not know. They are also super easy to make and her directions are easy to follow. It is a great cookie to make for a party since they do yield 4 dozen.


Cons: I had a love-hate relationship with the graham cracker bottom. If you bake too long, which I had the unfortunate experience of doing with my second batch, the graham cracker will burn and taste nasty. These are also a cookie that do not stay fresh for more than a day. I sealed a dozen or so up and by the next day the graham cracker was stale and we actually ended up just peeling the cookie from the cracker and eating it solo. I would definitely recommend serving these the same day you make them.


Revisions: I have no suggestions on how to improve this recipe except to say that it might be easier if you just crushed up the graham cracker and baked it in with the batter. It would eliminate the stale bottom and you wouldn't have to worry so much about burning the temperamental graham cracker bottom. Here are some other S'mores recipes to try out:


"S'mores Cookies" from Martha Stewart.
Can Martha do any wrong? Photo from www.marthastewart.com


"S'mores Cookie Bars" from www.lovintheoven.com
S'mores Bars. Photo from www.lovintheoven.com


"S'mores Cookies" from heatovento350.blogspot.com


S'Mores Cookie. Photo from heatovento350.blogspot.com


 I think I would try the last recipe from HeatOven first because they look easiest to make and most like the idea of mixing in the graham crackers to the batter that I had in mind. If anyone beats me to it let me know how it turns out.


Happy New Year and I will see you in 2012 with more recipes, good or bad, to share!

Friday, December 30, 2011

First Fail of the Blog: Turkey Cutlets in Mango Salsa

It was bound to happen sooner or later, the first fail of the blog. I had high hopes for this recipe mostly because the premise of this blog was so good! I discovered "Crockpot365" on Pinterest and it's one of those blogs that makes you want to scream, "Why didn't I think of that?!" This lady is an evil genius and also somewhat of a saint considering she actually used her Crockpot every day for an entire year. I have to say, I was and still am completely impressed by her dedication to her Crockpot craft and she has hundreds of recipes to chose from. She is also honest enough to list what recipes flopped and that's realistic because who, out of an entire year of cooking, doesn't have some failure recipes every once and awhile? I unfortunately have another to add to the list, "Turkey Cutlets in Mango Salsa". I wanted this to be good, it sounded good, even the picture looks good, but the combination of flavors is just completely off. Here's the recipe so you can see for yourself:


See it looks pretty good! Photo from www.crockpot365.blogspot.com


The Ingredients.


--1 lb of turkey breast cutlets. Or pork.
--1 can tomatoes and chiles
--2 mangoes
--2 peaches
--1 T dried minced onion
--1/4 cup water


The Directions.


--peel and chop up the fruit. Mother Nature most certainly had a sense of humor when she developed mangoes. Those things are ridiculously hard to cut.
--in a small bowl, combine the can of tomatoes and chiles with the chopped fruit, water, and dried onion flakes.


--lay the pieces of meat into the bottom of the crock--slightly stagger the pieces so they don't stick together.


--cover with your newly-made salsa

According to the salsa experts you are supposed to use cilantro in salsa to make it "real"---I didn't have any--yet! I'm working on it...

cook on low for 5-8 hours, or on high for 3-4. If you use turkey, it will be a bit tough if you cook it on high.

Pros (because there is always something positive): It is a quick and easy recipe to make and is fairly healthy. Also, and this is a little tangent, I really just like this woman's blog, from her writing to the fact that, her final pictures look like something anyone could make. She doesn't try to make it look perfect, or fancy, and sometimes the pictures don't even make the food look that appetizing, but it does look real. It isn't cooking magazine quality and I love her blog for that. It really is an everyday woman (or man's) kind of foodie blog. 

Cons: It tastes terrible. The combination of the spicy tomatoes and chilies and the acidity of the fruit do not mix. Maybe if you did without the tomatoes and chilies it would have been ok or used something else instead, but something about this recipe was not jiving. It wasn't inedible per say, but did qualify for a "lets order pizza instead" dinner night. The one person who did enjoy it was the dog though, who received most of the failed meal. Her palette is not to be trusted though as this is the same dog that licks gum stuck on the sidewalk and would never turn down a free scrap of food she "isn't supposed to normally receive". Beggar.

Recipe Revisions: Honestly, I'm not sure. I think it's just a bad combination of flavors. If anyone wants to take a stab at it and figure out what could be done to make this recipe contend for a "Foodie Blog Redemption", let me know. I'm not sure if I am brave enough to try this recipe again. I will take a stab at another "Cooking365" recipe in the future though because I cannot believe a blog that creative can have 365 days of terrible recipes.

Confession moment, it doesn't feel great calling out a recipe for sucking, but that's the point of the blog, to show the good as well as the bad, so you don't waste time on an awful recipe the same way I did. There you have it, first grenade dodged. 

Thursday, December 29, 2011

Mini-Mint Truffle Brownie Bites-Need I Say More?

These Mini-Mint Truffle Brownie Bites caught me eye while I was perusing Pinterest a few days ago. I happened to have received a bag of Mint Truffle's Hershey Kisses in the mail that day from my aunt (that may seem weird to some, but that's just my aunt, it's her form of baked goods). Anyway, I was excited to find a recipe that would incorporate my delicious little Kisses and happened to included all ingredients I already had in my house.

The recipe comes from "Lauren's Latest" which is amazing and super legit foodie blog (I mean the woman was on Good Morning America-come on!). Her tag line says it all: Everyday Ingredients-Extraordinary Food; now that's my kind of woman. 

The recipe makes 48, but I had no need for 48 brownies (nor did my waistline) so I halved the recipe instead.

Her's. They are adorable. Photo from www.laurenslatest.com
Surprise inside! Photo from Laurenslatest.com


Mine (See Revisions below) 
Not as pretty, but same result!
   
Here it is:

Mini Mint Truffle Brownie Bites
yield 48
Ingredients:
for the brownies-
1 cup butter
6 oz. Scharffen Berger bittersweet dark chocolate 
5 tablespoons Scharffen Berger cocoa powder
2 cups granulated sugar
4 whole eggs
1 1/2 teaspoons vanilla
1/2 teaspoon baking powder
1 teaspoon salt
1 3/4 cup all purpose flour
48 Mint Truffle Hershey Kisses, plus more for garnish if desired
All the soldiers 
Note: I have no idea what Scharffen Berger chocolate and cocoa are. I had Hershey's Cocoa and Ghirardelli Chocolate in my pantry so that's what I used. It's good enough for me. 
for the frosting-
1/2 cup butter, softened
2 cups powdered sugar
1 teaspoon peppermint extract
1 teaspoon vanilla
splash of milk, if needed
green food coloring
Directions:
Preheat oven to 350 degrees. Line 48 mini muffin tins with paper liners and set side.
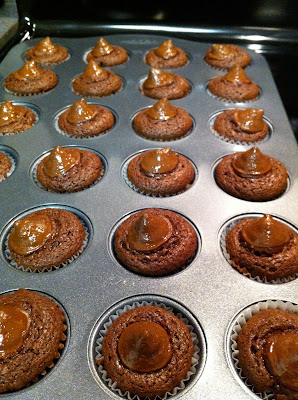
Melt butter and chocolate together in microwave. Stir in sugar and cocoa. Stir in eggs and vanilla. Stir in all dry ingredients. Spoon into prepared pan to fill 2/3 way. Unwrap Mint Truffle kisses and press 1 into each brownie bite. Bake 10-12 minutes or until brownie is thoroughly cooked. Cool completely.
Pre oven 


Fresh out of the oven

For the frosting, whip all ingredients together in a large stand mixer until smooth and creamy. Frost the tops of each brownie bite and add a piece of mint truffle kiss to each one as decoration. Serve.
My prettiest one. It was downhill from here. 


Pros: They are delightfully good. The softness of the brownie with the gooey Kiss inside makes it a dessert that you can't have just one of. These are definitely for the true mint lover.
Cons: I'm not sure why, but my brownies stuck to the mini muffin liners really badly. I've never had that happen before. This next one is really a personal con, but I stink at using a pastry bag. I used one of the disposable ones that you stick a nozzle in one end, fill the bag with frosting, and then squeeze it onto the brownie. This is the first time I've used one and let me tell you it is a messy business! Also, I completely missed the part where you are instructed to fold down the top end so that it doesn't end up coming out the nozzle and the top of the bag while you are decorating. Frosting was everywhere. I would have taken a photo if I didn't have icing all over my being. So noted. 
In lieu of a pastry bag I think you could just smooth some frosting on with a knife and they would be just as good. Throw on some sprinkles or another Hershey Kiss to cover up any mistakes. It takes awhile to learn how to ice, I'm still learning obviously, and if I can be completely honest, after 18 I said forget it and just iced them with a butter knife. They taste just as good. 
Revisions: I noticed that it took more like 13-15 minutes for my brownies to bake. Also, I added a splash of heavy cream in with my frosting because I had some that I had to use up and while not the healthiest option, it is delicious. I also had a little milk thrown in, but next time I would use one or the other because my frosting was a little watery. 
Also, as you can tell, mine look a lot different from Lauren's (unless you are color blind). I didn't have green food coloring in the house, so I figured red would do. And I was too lazy to half the Kisses and use them as garnish, so I threw a pearl looking sprinkle I had on top. Sometimes you just have to use what you have and make it work. As long as it tastes good, that is what is important! 
Overall these get two thumbs up. They do take some time, but true to her word, they involve most ingredients one already has in the house and they are actually extraordinary. 

Monkeying Around: Nutella Banana Bread

I can finally appreciate how my mom must have felt when I was a surly teenager and she made a homemade meal just to hear me quip that I would rather have takeout or I suddenly had an aversion to said ingredients in the dish. I'm thankful she didn't kill me. 

I sort of felt the same way after stock piling vegetables and fruit in the house for our holiday guests, only to find that barely a dent was made. Subway was apparently more popular for lunch than a homemade sandwich with some delicious fruits and veggies on the side. Grrr. 

Two days ago this is where I found myself, with a whole bunch of vegetables and fruit, specifically a Banana Mafia threatening to over ripe. Let's just say the form of torture they promised to provide (aka forcing me to eat them all in one sitting-I'm not a huge banana fan) was almost as unbearable as the thought of letting them all go to waste. So, I decided to beat them, literally beat them, at their own game and turn them into something delicious that the whole family could enjoy: Nutella Banana Bread. 

I found this recipe while perusing the boards over at Pinterest and knew I had to try it. I really didn't want to make just plain 'ol Banana Bread with my Mafia Bananas, so I figured Nutella would provide the perfect burial for my bananas. This recipe comes from "Baking with Basil", a foodie blog that mostly focuses on breads and desserts, but also has a few dinner recipes thrown in for good measure. Here's the recipe:


Nutella Banana Bread: Basil's version. She's good at the swirly thing. Photo from: www.bakingwithbasil.com


Nutella Banana Bread
Adapted from Sugar Plum
Ingredients
  • 2 1/3 cups all-purpose flour
  • 1 tsp baking powder
  • 1 tsp baking soda
  • 1/2 tsp salt
  • 1 1/4 cups mashed ripe banana (about 3 bananas)
  • 6 tbsp unsalted butter, softened
  • 1/2 cup sugar
  • 1/2 cup packed brown sugar
  • 1 tsp vanilla extract
  • 2 large eggs, room temperature
  • 1/2 cup Nutella
1.  Preheat oven to 350 degrees.  Spray a 9 inch loaf pan with non-stick cooking spray.
2.  In a medium bowl, whisk together flour, baking powder, baking soda and salt.
3.  In a large mixing bowl, beat together banana, butter, sugar, brown sugar, and vanilla until combined, about 2 minutes.  Beat in eggs, one at a time, until fully incorporated.  Reduce mixer to low speed, slowly add flour  mixture.  Stir just until combined.
4.  Place 1/3 of batter into a separate bowl.  In a small glass bowl, heat Nutella in microwave for about 15 seconds.  Remove from microwave and stir.  Place heated Nutella in bowl with 1/3 of the batter.  Stir together until combined.
5. Place 1/2 of banana batter in loaf pan, spread evenly.  Add layer of Nutella batter, add layer of banana batter.  Using a knife, gently swirl batter.  Bake for 50-60 minutes, or until a toothpick inserted into bread comes out with a few crumbs.
Notes
  • Combine banana batter and Nutella batter in any way you desire.  There is no right or wrong way
  • Once loaf is cooled, wrap tightly in foil or plastic wrap and place in an airtight bag or container
  • I found the bread to be more flavorful the next day.  If the top of your bread is a little crispy, that’s ok.  It will soften once stored.
Pros: This recipe is delicious! My husband and brother literally ate half a loaf in one breakfast sitting. It holds for a few days and, true to Basil's word, it does soften the next day. 

Cons: Steps 4 and 5 (besides the whole melting of the Nutella) are a pain in the butt and pretty unnecessary. Also, it requires an extra bowl, which in my book means extra dishes to wash and I am not into that. I think if you just mixed the Nutella into the batter and poured it right in the baking pan you would be fine. But hey, if you have the time and the skills to make it look swirly, knock yourself out.

Recipe Revisions: Besides forgoing the whole layering method of the recipe, I have no changes. This is truly just a really solid recipe that everyone is sure to love.


My final product. Note the lack of swirl. Still yummy though!


Wednesday, December 28, 2011

Mini Pecan Pie Muffins

If Buddy from "Cake Boss" and "Martha Stewart" procreated, it would be my sister-in-law, Melissa (without the Hoboken no jokin' accent and the whole jail thing and looking completely different from them, anyway you will understand my point in a second). She is a baking goddess amongst men and women and for that, I bow down to her. When you have a chance you should really check out her website "Simply Sweet Bakery" to see her stuff, it's amazing (and she's had no formal training! It's crazy!). But, it was one of the recipes you won't find on her website, but that is truly simply sweet, that I knew I had to try (and could realistically have a chance at imitating). Mini. Pecan. Pie. Mini. Muffins. Oh yes, I went there. 


When I first tried these delectable two biters, I had something of a food epiphany. One of my favorite desserts is Pecan Pie and here was a way not only to eat it in a cleaner fashion and have more of it without feeling guilty (who really can keep track of how many mini muffins they pop into their mouths?), but also to have it as a suitable companion with breakfast, lunch, or dinner! I felt like a kid who had snuck by a dessert food and passed it off as dinner. It was fantastic! 


The first excuse I had to make 24 mini muffins and not eat them all myself I jumped on the chance and got the recipe. While I'm not sure if she came up with it herself (likely though) I still received it online so it counts for this blog for all intensive purposes. Here is the insanely delicious (and easy!) recipe:


Christmas Morning Muffins!


Pecan Pie Mini Muffins

Ingredients

1 cup firmly packed light brown sugar
    1 cup chopped pecans
    1/2 cup all-purpose flour
    1/2 teaspoon baking powder
    1/4 teaspoon salt
    1/2 cup butter, melted
    2 large eggs, lightly beaten
    1 teaspoon vanilla extract

    Preparation

    • Preheat oven to 425°
    • Combine first 5 ingredients in a large mixing bowl.
    • Make a well in center of mixture.
    • Stir together butter, eggs, and vanilla; add to dry ingredients, and stir just until moistened.
    • Spoon batter evenly into lightly greased miniature muffin pans, filling three-fourths full.
    • Bake in center of oven for 8 to 10 minutes.

    As far as the recipe goes, I have no edits. Also, I wouldn't dare edit my sister-in-law's recipe anyway (baking is pretty serious in our family). The one thing I have thought of that could be delicious variation is to try adding some bittersweet chocolate or cocoa powder to the recipe to make them chocolate pecan pie mini muffins, but I'm not sure if you could still pass it off as dinner food. If a brave soul would like to try that, get back to me and let me know how it turns out. 

    Another fantastic thing about this recipe (besides the fact that it is only five simple steps) is that anyone can make it and have them look perfect. As long as you remember to grease the pan, you too will have muffin shaped bites of deliciousness to share with your friends and family. 

    Note: This recipe makes 24, if you have hungry children (or siblings that seem like your children) make more. My nineteen-year-old brother had something like ten before we had finished unwrapping presents on Christmas morning. 

    Funfetti Sandwich Cookies: The Cookie for the Decorating Disabled

    I have a confession to make. I am terrible at "beautifying" desserts or anything creative for that matter. I was that kid with the ugly poster during class presentations in middle school with the slanted writing and uneven cutting while other girls had glittery perfectly shaped posters with bubbly handwriting (the kind where you put an "o" instead of a dot over your I's, you know what I'm talking about). I hated those girls. The point is, while the final project wasn't always pretty, the content was there. The same goes for my baking; it may not always look picture perfect, but it usually tastes delicious. Unless it's a horrific recipe of course.


    So this recipe is for you ladies (and handful of men) out there that were ugly poster makers like myself. These cookies even the playing field. It is impossible to fail at making these cookies look like the picture and therefore delicious, which they are. This first recipe comes from Baked Perfection and they are called "Funfetti Sandwich Cookies". I knew I was going to love these because A. I love anything in sandwich form and B. They incorporate my favorite food group: sprinkles. 


    Hers. (Photo from BakedPerfection.com)


    Mine. (See! Not half bad!) 


    The Recipe: 


    Funfetti Sandwich Cookies


    recipe from Baked Perfection

    makes approximately 24 sandwich cookies

    1 (18.25) package Funfetti Cake
    2 eggs
    1/3 cup vegetable oil
    2 tablespoons milk
    1 teaspoon vanilla extract

    Preheat oven to 375 degrees F. Pour cake mix into a large bowl. Stir in eggs, oil, milk, and vanilla until combined. Drop teaspoons of dough onto an ungreased cookie sheet. Bake 7-9 minutes in the preheated oven. The bottoms will be light brown. Move cookies to a cooling rack, cool completely before assembling.

    Frost bottom side of half the cookies. Top with unfrosted cookie. Roll edges in assorted sprinkles.

    Very Vanilla Frosting
    recipe by Baked Perfection

    1 stick of butter, softened
    3 cups powdered sugar
    pinch of salt
    1 1/2 tablespoons vanilla extract
    2 tablespoons milk

    Beat butter and vanilla until creamy. Add salt. Add powdered sugar 1 cup at a time, beating until combined. Add milk 1 tablespoon at a time until you reach desired consistency

    I honestly have no edits, it is very straight forward. The only recommendation I would make is to have plenty of sprinkles on hand because those suckers require a lot! Also, have someone to give them to or you may end up eating 14 on your own in one sitting (not that I did that of course). 

    Overall I give this recipe two thumbs up. They are easy to make without being your run of the mill cookie, colorful, and most importantly, insanely good. 

    Welcome/Is This Really Happening?

    Crazy ideas always hit me at the most inopportune times (like 12am the night before a job interview). I decided instead of trying to take my mind off said interview by reading "The Hunger Games" (oddly enough not very relaxing), I would think about food. I think about food a lot. Especially during unemployment. Why you ask? Because unemployment (or as I call it a housewife without a choice) has allowed me to discover the cooking diva no one believed was in me (to this day no one will let me live down the time I put Easy Mac in the microwave and forgot to add water, setting off the smoke alarm). During this extended period of "actively seeking employment"I have come to discover, mostly because of Pinterest and from food blogs it has introduced me to, that food can be pretty, fun to prepare, and quite frankly addicting. I can't wait to try that next recipe that is going to top the previous one. And if that sounds lame so be it! (Note: It is deliciously lame, though). 


    What I have also learned through my cooking adventures is that 1. Most people don't actually try the recipes they "pin" and 2. There's no way to tell if a recipe is going to be good or not or as "simple" "low fat", or "quick and easy" as the writer claims it to be. My goal with this blog is to share with you my findings and give an objective, honest view on the recipes I find. I don't claim to be an expert, just a regular married woman looking for recipes that are worthwhile to feed to my family of four (my husband, myself, my 19-year-old brother, and the dog). I hope that you discover this blog to be entertaining, informative, and a place where you can come back for excellent recipes and those that you are better off avoiding.


    So, maybe this idea wasn't all that crazy...